By: Mathew Thomas
Published: 24 Oct 2022
Last Updated: 19 Jun 2026
Running Rails in Docker in a local developer environment has many benefits. My favorite is that we can build and test our Rails app using different version combinations of Ruby, Rails and Postgres all at the same time without polluting our developer environment with different versions of the same software packages and dependencies. Instead of installing all these software packages and their dependencies locally, we simply build Docker images with the specific versions of packages we care about.
Another great benefit of running Docker locally and in production is preventing system and configuration drift. drift is the difference between the expected configuration of a system versus the actual configuration of a system. By developing locally using Docker, what "works on my machine" as a developer is what actually ships into production (Docker image binary, code branch). In addition, drift is also a common source of introducing security vulnerabilities as well as unexpected behavior and bugs.
In this blog, we'll setup a basic Rails app using Ruby 3.1.1, Rails 7.0.2, Postgres 14.2 and the latest versions of Node.js and Yarn.
To get started, we'll first need to install the Docker engine on your local development system. You can get the latest Docker here. Since I currently run Ubuntu Focal 20.04 (LTS) as my local developer environment, I followed these instructions to install Docker.
After installing successfully, you should be able to run the docker version command and see the latest version, like this:
$ docker version
Client: Docker Engine - Community
 Version:           20.10.11
 API version:       1.41
 Go version:        go1.16.9
 Git commit:        dea9396
 Built:             Thu Nov 18 00:37:06 2021
 OS/Arch:           linux/amd64
 Context:           default
 Experimental:      true

Server: Docker Engine - Community
 Engine:
  Version:          20.10.11
  API version:      1.41 (minimum version 1.12)
  Go version:       go1.16.9
  Git commit:       847da18
  Built:            Thu Nov 18 00:35:15 2021
  OS/Arch:          linux/amd64
  Experimental:     false
 containerd:
  Version:          1.4.12
  GitCommit:        7b11cfaabd73bb80907dd23182b9347b4245eb5d
 runc:
  Version:          1.0.2
  GitCommit:        v1.0.2-0-g52b36a2
 docker-init:
  Version:          0.19.0
  GitCommit:        de40ad0
Note: that specific component versions may vary.
You can (and should) test your local Docker installation by running the official hello-world Docker image like this:
$ docker run hello-world
Unable to find image 'hello-world:latest' locally
latest: Pulling from library/hello-world
2db29710123e: Pull complete
Digest: sha256:cc15c5b292d8525effc0f89cb299f1804f3a725c8d05e158653a563f15e4f685
Status: Downloaded newer image for hello-world:latest

Hello from Docker!
This message shows that your installation appears to be working correctly.

To generate this message, Docker took the following steps:
 1. The Docker client contacted the Docker daemon.
 2. The Docker daemon pulled the "hello-world" image from the Docker Hub.
    (amd64)
 3. The Docker daemon created a new container from that image which runs the
    executable that produces the output you are currently reading.
 4. The Docker daemon streamed that output to the Docker client, which sent it
    to your terminal.

To try something more ambitious, you can run an Ubuntu container with:
 $ docker run -it ubuntu bash

Share images, automate workflows, and more with a free Docker ID:
 https://hub.docker.com/

For more examples and ideas, visit:
 https://docs.docker.com/get-started/
Next we need to install Docker Compose. Compose allows us to easily define, orchestrate and run multi-container Docker applications - all from a single YAML file. To install Docker Compose, simply follow the instructions here here for your platform. Once you've installed docker-compose, you can verify the installation by printing out the version like this:
$ docker-compose --version
docker-compose version 1.29.2, build 5becea4c
Note: that your versions of Docker and Docker Compose might be newer than the ones shown here, which is fine for the purpose of this blog.
Alright! We've installed Docker and Docker Compose. Let's start building our multi-container Rails app!
Let's create a directory, myapp, for our project. At the terminal, mkdir myapp and then change into the directory.
Next, create a file named Dockerfile and paste in the following:
FROM ruby:3.1.1-alpine3.15

RUN apk add --update build-base bash bash-completion libffi-dev tzdata postgresql-client postgresql-dev nodejs npm yarn

WORKDIR /app

COPY Gemfile* /app/

RUN gem install bundler

RUN bundle install

RUN bundle binstubs --all

RUN touch $HOME/.bashrc

RUN echo "alias ll='ls -alF'" >> $HOME/.bashrc
RUN echo "alias la='ls -A'" >> $HOME/.bashrc
RUN echo "alias l='ls -CF'" >> $HOME/.bashrc
RUN echo "alias q='exit'" >> $HOME/.bashrc
RUN echo "alias c='clear'" >> $HOME/.bashrc

CMD [ "/bin/bash" ]
Our Dockerfile starts from the public image, [ruby:3.1.1-alpine3.15](https://github.com/docker-library/ruby/blob/cf80cd6600ded0516cb70087d38823da4c52774e/3.1/alpine3.15/Dockerfile). It then runs theapk addcommands to add some Rails and Postgres dependencies, as well as some extras such asbashandbash-completion`. These are for convenience and are optional.
Next we COPY our Gemfile into the image /app/ location and then bundle install. Lastly, we create a .bashrc file and add some helpful bash aliases. Again, these are for convenience and are optional.
Our Gemfile also goes in the myapp folder and is very simple. It installs the Rails 7 gem. That's it!
source 'https://rubygems.org'
gem 'rails', '~> 7.0.2', '>= 7.0.2.2'Next, let's create docker-compose.yml (also in the myapp folder) and paste in the following code:
version: '3'
services:
  db:
    image: postgres:14.2-alpine
    container_name: myapp-postgres-14.2
    volumes:
      - postgres_data:/var/lib/postgresql/data
    command: "postgres -c 'max_connections=500'"
    environment:
      POSTGRES_DB: myappdb
      POSTGRES_USER: my_user
      POSTGRES_PASSWORD: ILoveDoingKnowBe4Training!
    ports:
      - "5432:5432"
  myapp-web:
    build: .
    command: "bundle exec rails s -p 3000 -b '0.0.0.0'"
    environment:
      DB_HOST: db
      DB_NAME: myappdb
      DB_USERNAME: my_user
      DB_PASSWORD: ILoveDoingKnowBe4Training!
    volumes:
      - .:/app:cached
    ports:
      - "3000:3000"
    depends_on:
      - db
volumes:
  postgres_data: {}
networks:
  default:
    name: myapp_default
This compose file specifies 2 services: db for our Postgres and myapp-web for our Rails web application. The docker-compose.yml file will be used by docker-compose to fully orchestrate and run the containers needed by our app. For details on the Docker Compose file structure, see the documentation here.
Now we're ready to create our Rails app. From a terminal inside the myapp folder, type and enter the following command:
docker-compose run --no-deps myapp-web rails new . --force --database=postgresqlIf the command starts successfully, you will see output that looks like this:
Creating network "myapp_default" with the default driver
Creating volume "myapp_postgres_data" with default driver
Building myapp-web
Step 1/16 : FROM ruby:3.1.1-alpine3.15
3.1.1-alpine3.15: Pulling from library/ruby
...
Depending on the speed of your computer and internet connection, this command could take a few minutes to complete.
Running this command will do a few things for us. First, a new Docker image is created, myapp_myapp-web. You can see this new image by typing the docker images command. Second, this will also create our new Rails app in the current directory with Postgres as our database. Notice that the Gemfile was re-written by Rails. Mine looks like this:
source 'https://rubygems.org'
git_source(:github) { |repo| "https://github.com/#{repo}.git" }

ruby '3.1.1'

# Bundle edge Rails instead: gem 'rails', github: 'rails/rails', branch: 'main'
gem 'rails', '~> 6.1.4', '>= 6.1.4.6'
# Use postgresql as the database for Active Record
gem 'pg', '~> 1.1'
# Use Puma as the app server
gem 'puma', '~> 5.0'
# Use SCSS for stylesheets
gem 'sass-rails', '>= 6'
# Transpile app-like JavaScript. Read more: https://github.com/rails/webpacker
gem 'webpacker', '~> 5.0'
# Turbolinks makes navigating your web application faster. Read more: https://github.com/turbolinks/turbolinks
gem 'turbolinks', '~> 5'
# Build JSON APIs with ease. Read more: https://github.com/rails/jbuilder
gem 'jbuilder', '~> 2.7'
# Use Redis adapter to run Action Cable in production
# gem 'redis', '~> 4.0'
# Use Active Model has_secure_password
# gem 'bcrypt', '~> 3.1.7'

# Use Active Storage variant
# gem 'image_processing', '~> 1.2'

# Reduces boot times through caching; required in config/boot.rb
gem 'bootsnap', '>= 1.4.4', require: false

group :development, :test do
  # Call 'byebug' anywhere in the code to stop execution and get a debugger console
  gem 'byebug', platforms: [:mri, :mingw, :x64_mingw]
end

group :development do
  # Access an interactive console on exception pages or by calling 'console' anywhere in the code.
  gem 'web-console', '>= 4.1.0'
  # Display performance information such as SQL time and flame graphs for each request in your browser.
  # Can be configured to work on production as well see: https://github.com/MiniProfiler/rack-mini-profiler/blob/master/README.md
  gem 'rack-mini-profiler', '~> 2.0'
  gem 'listen', '~> 3.3'
  # Spring speeds up development by keeping your application running in the background. Read more: https://github.com/rails/spring
  gem 'spring'
end

group :test do
  # Adds support for Capybara system testing and selenium driver
  gem 'capybara', '>= 3.26'
  gem 'selenium-webdriver'
  # Easy installation and use of web drivers to run system tests with browsers
  gem 'webdrivers'
end

# Windows does not include zoneinfo files, so bundle the tzinfo-data gem
gem 'tzinfo-data', platforms: [:mingw, :mswin, :x64_mingw, :jruby]
You'll notice that the files created for the Rails app are all owned by user, root. This is because Docker by default runs as user, root. You can simply change the owner of all the files to your user with the following command:
sudo chown -R $USER:$USER .Now that the new Rails app has been created and the Gemfile has been re-written, we need to rebuild our app Docker image. We can do this simply by running the following command at the terminal:
docker-compose buildThis will rebuild the Docker image, myapp_myapp-web. This should be the last time we need to build myapp_myapp-web for our project.
Next, we need to configure our Rails database config to connect to our local Postgres container. Simply delete the contents of config/database.yml and add the following:
default: &default
  adapter: postgresql
  encoding: unicode
  pool: <%= ENV.fetch("RAILS_MAX_THREADS") { 5 } %>
  host: <%= ENV.fetch('DB_HOST', 'localhost') %>
  database: <%= ENV['DB_NAME'] %>
  username: <%= ENV['DB_USERNAME'] %>
  password: <%= ENV['DB_PASSWORD'] %>

development:
  <<: *default

test:
  <<: *default
The environment variables used in config/database.yml are set in our docker-compose.yml.
Now that our app has been created and our database settings have been properly configured, we are ready to run our app. We can launch our app via docker-compose by running the following commmand:
docker-compose upYou will see output like this:
$ docker-compose up
Creating network "myapp_default" with the default driver
Creating myapp-postgres-14.2 ... done
Creating myapp_myapp-web_1   ... done
Attaching to myapp-postgres-14.2, myapp_myapp-web_1
myapp-postgres-14.2 |
myapp-postgres-14.2 | PostgreSQL Database directory appears to contain a database; Skipping initialization
myapp-postgres-14.2 |
myapp-postgres-14.2 | 2022-03-07 21:27:02.312 UTC [1] LOG:  starting PostgreSQL 14.2 on x86_64-pc-linux-musl, compiled by gcc (Alpine 10.3.1_git20211027) 10.3.1 20211027, 64-bit
myapp-postgres-14.2 | 2022-03-07 21:27:02.312 UTC [1] LOG:  listening on IPv4 address "0.0.0.0", port 5432
myapp-postgres-14.2 | 2022-03-07 21:27:02.312 UTC [1] LOG:  listening on IPv6 address "::", port 5432
myapp-postgres-14.2 | 2022-03-07 21:27:02.314 UTC [1] LOG:  listening on Unix socket "/var/run/postgresql/.s.PGSQL.5432"
myapp-postgres-14.2 | 2022-03-07 21:27:02.316 UTC [21] LOG:  database system was shut down at 2022-03-07 21:25:27 UTC
myapp-postgres-14.2 | 2022-03-07 21:27:02.319 UTC [1] LOG:  database system is ready to accept connections
myapp-web_1  | => Booting Puma
myapp-web_1  | => Rails 7.0.2.2 application starting in development
myapp-web_1  | => Run `bin/rails server --help` for more startup options
myapp-web_1  | Puma starting in single mode...
myapp-web_1  | * Puma version: 5.6.2 (ruby 3.1.1-p18) ("Birdie's Version")
myapp-web_1  | *  Min threads: 5
myapp-web_1  | *  Max threads: 5
myapp-web_1  | *  Environment: development
myapp-web_1  | *          PID: 1
myapp-web_1  | * Listening on http://0.0.0.0:3000
myapp-web_1  | Use Ctrl-C to stop
If you click on the link or open your browser to http://0.0.0.0:3000, you will see,
You can observe your containers are running with the following command:
docker ps -aYou will see output like this:
CONTAINER ID   IMAGE                  COMMAND                  CREATED          STATUS          PORTS                                       NAMES
45cd6a648032   myapp_myapp-web        "bundle exec rails s…"   15 seconds ago   Up 15 seconds   0.0.0.0:3000->3000/tcp, :::3000->3000/tcp   myapp_myapp-web_1
ec465d0bbbcc   postgres:14.2-alpine   "docker-entrypoint.s…"   16 seconds ago   Up 15 seconds   0.0.0.0:5432->5432/tcp, :::5432->5432/tcp   myapp-postgres-14.2
Notice the STATUS field is 'Up'. This means our containers are running. We have two containers running, one for our Postgres database and one for our Rails 7 app.
Now that our app is created and running, we will need to generate Rails controllers, models, routes, etc. To do this, we need access to the rails generator. To run the rails generator, we first need to shell inside our running myapp-web-1 container. Open a separate terminal and type the following command:
docker exec -it myapp-web /bin/bashThe result will be a bash prompt cursor inside your running Rails container. You can test this out by running a few commands:
rails -v

node -v

yarn -v
Let's use our new Rails, Postgres, Docker stack to implement the "Getting Started" example. First, let's edit config/routes.rb and add the following at the top of the Rails.application.routes.draw block:
Rails.application.routes.draw do
  get "/articles", to: "articles#index"
end
Next, from inside our container bash prompt, run:
rails generate controller Articles index --skip-routesSince we ran the generate command inside of a Docker container, the files generated are owned by root user. We want to edit some of these files so you will want to change the owner to your user:
chown -R $USER:$USER .We will need to chown files whenever we generate files.
Next, let's edit app/views/articles/index.html.erb and replace the contents with:
<h1>hello, Rails and Docker!</h1>Make sure to save the file after you edit. You can then browse to http://0.0.0.0:3000/articles and you should see the correct output.
Next (following the Getting Started guide), let's generate a model. From the bash prompt inside the container run the command:
rails generate model Article title:string body:textThis will generate a few files so we will need to chown these files before we can edit them.
In the db/migrate folder you should see a new migration file. From the bash prompt inside the running container, let's run the database migration:
rails db:migrateYou should see output that looks like this:
bash-5.1# rails db:migrate
== 20220401150827 CreateArticles: migrating ===================================
-- create_table(:articles)
   -> 0.0058s
== 20220401150827 CreateArticles: migrated (0.0059s) ==========================
Now we can use the Rails console to create some records in our new table. From the prompt inside the running container:
bash-5.1# rails consoleYou should see an irb prompt like:
Loading development environment (Rails 7.0.2.3)
irb(main):001:0>
From here let's create our first Article object:
irb(main):003:0> article = Article.new(title: "Hello Rails and Docker", body: "I am on Rails, Postgres and Docker!")You will see output like:
=> #<Article:0x00007f338eb70188 id: nil, title: "Hello Rails and Docker", body: "I am on Rails, Postgres and Docker!", created_at: nil, updated_at: nil>Now that we have an article object, we can save it to the database:
irb(main):005:0> article.save
  TRANSACTION (0.2ms)  BEGIN
  Article Create (0.6ms)  INSERT INTO "articles" ("title", "body", "created_at", "updated_at") VALUES ($1, $2, $3, $4) RETURNING "id"  [["title", "Hello Rails and Docker"], ["body", "I am on Rails, Postgres and Docker!"], ["created_at", "2022-04-01 15:33:01.808863"], ["updated_at", "2022-04-01 15:33:01.808863"]]
  TRANSACTION (10.4ms)  COMMIT
=> true
irb(main):006:0>
Let's generate one more article by entering:
irb(main):003:0> article = Article.new(title: "KnowBe4 is Hiring!", body: "KnowBe4 is an awesome place to work!")Make sure to save the object as before.
Lastly, let's show the list of articles on the articles index. Edit app/controllers/articles_controller.rb and change the index action to fetch all the articles from the database:
class ArticlesController < ApplicationController
  def index
    @articles = Article.all
  end
end
Then edit app/views/articles/index.html.erb and replace all the contents with the following:
<h1>Articles</h1>
<ul>
<% @articles.each do |article| %>
<li>
<p><%= article.title %></p>
<p><%= article.body %></p>
</li>
<% end %>
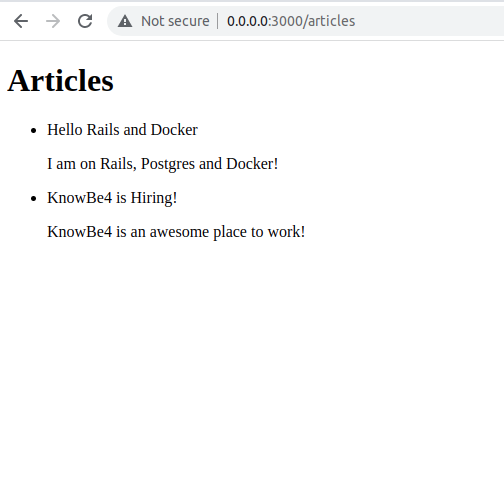
</ul>Reload your app web URL at http://0.0.0.0:3000/articles and you should see:
That's it! We're now running Rails 7 on Docker with Postgres as our database. We were able to build and run our Rails/Postgres app without installing Ruby, Rails, Node, Postgres or any dependencies. That's the beauty of Docker.
To shut down your Rails app type docker-compose down. To remove the Docker image you created for this project run, docker rmi myapp_myapp-web. Make sure you also remove the database volume created by Docker for our project but running docker volume rm myapp_postgres_data.
Have something to contribute? Passionate about purpose-driven, highly-productive software development? Send us an application! KnowBe4 Engineering is always looking for more talented engineers just like you! Check our open positions on our jobs page - www.knowbe4.com/careers.


KnowBe4 Engineering heavily uses On-Demand environments for quick iterations on native cloud-based…

How KnowBe4 solved the "It Works on My Machine" problem with a new approach to provisioning test…